Tinker Board bare metal: JTAG debugging
JTAG is a set of standards for testing digital circuits, which includes a four-wire serial protocol for debugging. ARM CPUs support JTAG via their debug facilities. This proves very useful for bare-metal programming where we don’t have OS support to inspect running code. While there is no visible “JTAG port” on the Tinker Board, JTAG debugging is available on RK3288 and this is how I use it.
Note: this article is part of a series on bare-metal programming on ASUS Tinker Board. What’s covered and what’s planned:
- Build and boot a bare metal ARM binary
- JTAG debugging ← this article
- The stack & C environment setup
- Basic peripherals - UART, GPIO
- MMU, caches, and cores
- …
The challenge
There are two hurdles to overcome before we can connect gdb:
- JTAG pins from the CPU are multiplexed (i.e. shared) with the
sdmmc0interface and the only physical access to them on the Tinker Board is through the microSD card slot.- see RK3288 Datasheet, section 2.7 Function IO description
- Upon reset,
sdmmc0interface is active and we need to set appropriate registers to usejtaginstead.- see RK3288 TRM, section 4.3.2 Detail Register Description, register
GRF_GPIO6C_IOMUX
- see RK3288 TRM, section 4.3.2 Detail Register Description, register
Physical connections
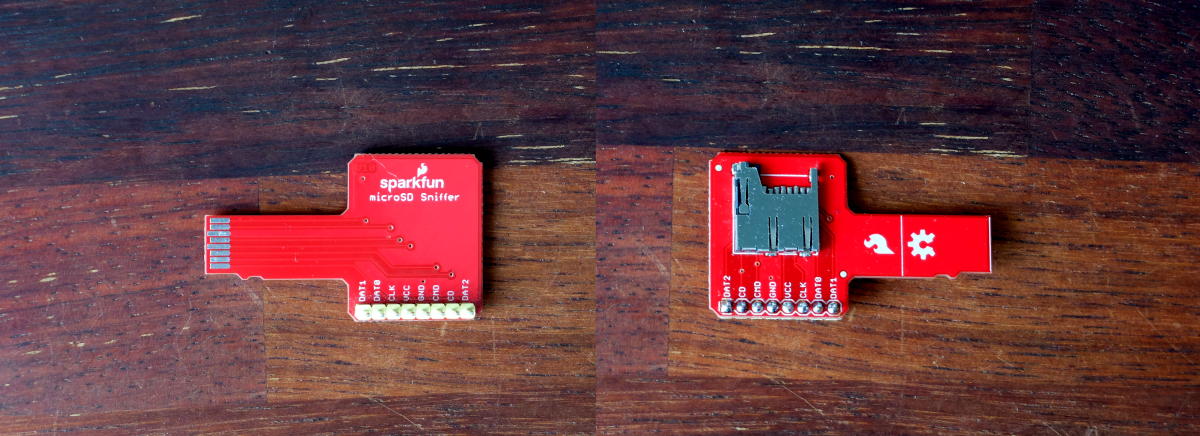
To break out the microSD/JTAG signals, I use the SparkFun microSD Sniffer. It’s a bit of a tight fit but once in it does the job nicely.
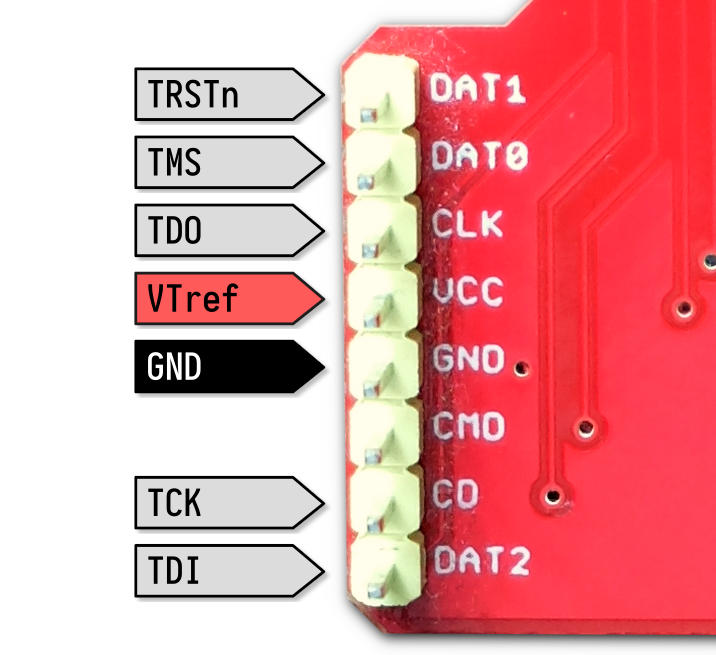
From the RK3288 datasheet, the SoC pins we’re interested in are:
SDMMC0_D0/JTAG_TMS/GPIO6_C0SDMMC0_D1/JTAG_TRSTN/GPIO6_C1SDMMC0_D2/JTAG_TDI/GPIO6_C2SDMMC0_D3/JTAG_TCK/GPIO6_C3SDMMC0_CLKOUT/JTAG_TDO/GPIO6_C4
And knowing that in microSD pinout D3 (data line bit 3) and CD (card detect) are the same, we get this map:
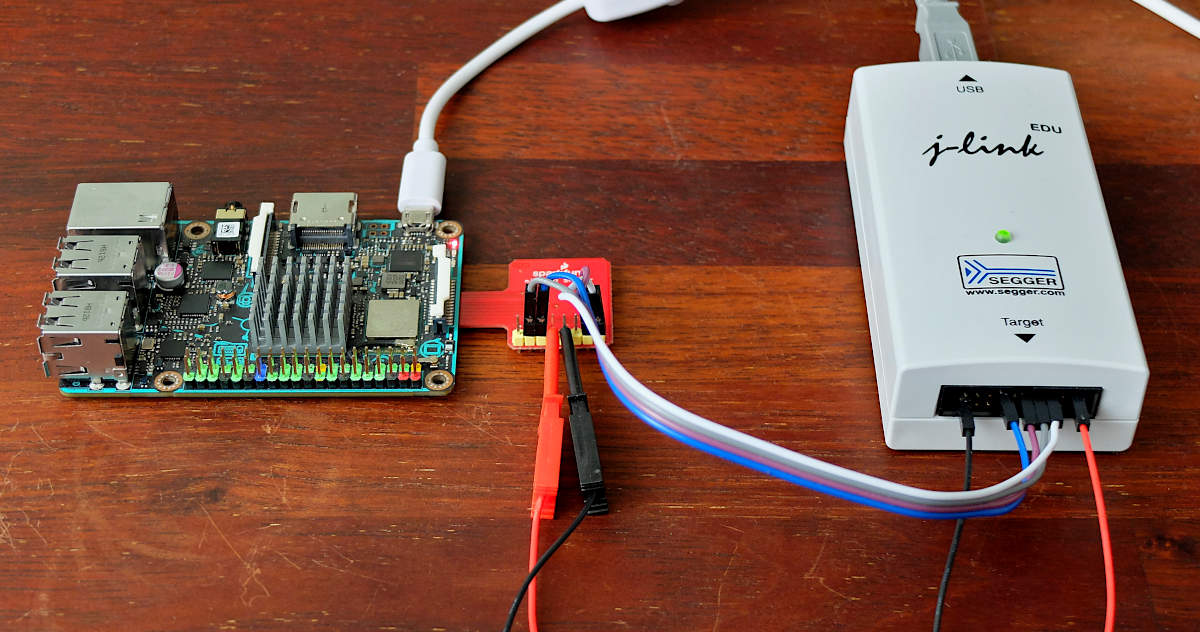
This can now be connected to your JTAG adapter. I’ve had good results with the J-Link, but I’m sure others can work fine as well. Please let me know at lukasz@THISDOMAIN if you have success with other adapters.
Multiplexing setup
Register GRF_GPIO6C_IOMUX at 0xff770064 selects between GPIO, SDMMC (the default), or JTAG on GPIO6C pins. To enable JTAG, bits [1:0], [3:2], [5:4], [7:6], and [9:8] need to be set to 0b10. In ARM assembly:
// Matching bits in upper halfword need to be set to 1
// to allow writing.
ldr r0, =0b00000011111111110000001010101010
ldr r1, =0xff770064
str r0, [r1]
See my repository for a minimal program which enables JTAG, and starts blinking the green LED in an infinite loop. We can now connect to the board via JTAG.
OpenOCD
OpenOCD comes with a configuration for my adapter (interface/jlink.cfg), but not for the RK3288 target. I’ve come up with this script. Uncomment the set and target lines to enable SMP mode. It should be possible to use a higher adapter_khz value.
Note I’m using OpenOCD 0.10.0. I believe a syntax change is coming in 0.11 around the TAP/DAP definition.
#
# Tinker RK3288
#

if { [info exists CHIPNAME] } {
        set _CHIPNAME $CHIPNAME
} else {
        set _CHIPNAME rk3288
}

if { [info exists CPUTAPID] } {
        set _CPUTAPID $CPUTAPID
} else {
        set _CPUTAPID 0x5ba00477
}

jtag newtap $_CHIPNAME dap -expected-id $_CPUTAPID -irlen 4

set _TARGETNAME0 $_CHIPNAME.cpu.0
# set _TARGETNAME1 $_CHIPNAME.cpu.1
# set _TARGETNAME2 $_CHIPNAME.cpu.2
# set _TARGETNAME3 $_CHIPNAME.cpu.3

target create $_TARGETNAME0 cortex_a -chain-position $_CHIPNAME.dap -coreid 0
# target create $_TARGETNAME1 cortex_a -chain-position $_CHIPNAME.dap -coreid 1
# target create $_TARGETNAME2 cortex_a -chain-position $_CHIPNAME.dap -coreid 2
# target create $_TARGETNAME3 cortex_a -chain-position $_CHIPNAME.dap -coreid 3

# Enable SMP mode
#target smp $_TARGETNAME0 $_TARGETNAME1 $_TARGETNAME2 $_TARGETNAME3

# Default to core 0
targets $_TARGETNAME0

adapter_khz 1000
With the connections wired and the program booted on the Tinker Board, save the script as tinker.cfg, and use the following:
$ openocd -f interface/jlink.cfg -f tinker.cfg
Open On-Chip Debugger 0.10.0
Licensed under GNU GPL v2
For bug reports, read
        http://openocd.org/doc/doxygen/bugs.html
Info : auto-selecting first available session transport "jtag". To override use 'transport select <transport>'.
adapter speed: 1000 kHz
Info : No device selected, using first device.
Info : J-Link V11 compiled Jan  7 2020 16:52:13
Info : Hardware version: 11.00
Info : VTarget = 3.393 V
Info : clock speed 1000 kHz
Info : JTAG tap: rk3288.dap tap/device found: 0x5ba00477 (mfg: 0x23b (ARM Ltd.), part: 0xba00, ver: 0x5)
Info : rk3288.cpu.0: hardware has 6 breakpoints, 4 watchpoints
Keep OpenOCD running. It runs a telnet console on port 4444 and a GDB server on 3333. Let’s try the console first:
$ telnet localhost 4444
Trying ::1...
Connection failed: Connection refused
Trying 127.0.0.1...
Connected to localhost.
Escape character is '^]'.
Open On-Chip Debugger
> halt
rk3288.cpu.0 rev 1, partnum c0d, arch f, variant 0, implementor 41
rk3288.cpu.0 cluster 5 core 0 multi core
target halted in ARM state due to debug-request, current mode: Supervisor
cpsr: 0x200001d3 pc: 0xff70403c
MMU: disabled, D-Cache: disabled, I-Cache: disabled
(LED stops blinking)
> resume
(LED starts blinking again)
halt the CPU again and let’s try gdb:
$ arm-none-eabi-gdb boot.elf -ex 'target remote :3333'
GNU gdb (GDB) 9.1
Copyright (C) 2020 Free Software Foundation, Inc.
License GPLv3+: GNU GPL version 3 or later <http://gnu.org/licenses/gpl.html>
This is free software: you are free to change and redistribute it.
There is NO WARRANTY, to the extent permitted by law.
Type "show copying" and "show warranty" for details.
This GDB was configured as "--host=x86_64-pc-linux-gnu --target=arm-none-eabi".
Type "show configuration" for configuration details.
For bug reporting instructions, please see:
<http://www.gnu.org/software/gdb/bugs/>.
Find the GDB manual and other documentation resources online at:
    <http://www.gnu.org/software/gdb/documentation/>.

For help, type "help".
Type "apropos word" to search for commands related to "word"...
Reading symbols from boot.elf...
Remote debugging using :3333
delay () at main.S:34
34              bne 1b
(gdb)
Here boot.elf is the compiled program, before objcopy. For better readability, build with debug symbols (-g). It’s now possible to step, inspect registers, set breakpoints, etc.
The gdb connection also allows faster development. After rebuilding boot.elf, reload it with load. Thanks to this it’s not necessary to flash the program to SD card after each compilation.
Notes
I was hoping to find a more affordable - and/or more open - JTAG adapter to connect to the board. I tried the FT2232H-56Q mini module as the JTAG adapter, but couldn’t get it to connect to target. I also tried the Versaloon for STM32 blue pill firmware - again to no result. I still believe there are options out there, I just haven’t found one to work as the J-Link. I would be curious to test the Bus Blaster or the Blackmagic probe.